tp
Developer Guide
- Developer Guide
Introduction
Welcome to Study It Developer Guide!
This document details the architecture of Study It. It aims to provide an overview of the high-level system architecture and design of the app. It will also break down the design of the app into smaller components and be explained in detail. This will allow the readers to understand the architecture and design flow of Study It and how it operates.
Study It is an interactive desktop app that helps NUS students manage their study related matters especially during this online study environment. It is optimized for use via a Command Line Interface (CLI). It can keep track of the student’s various study matters, present them in an organized and thoughtful manner to help them organize their study life. It will also provide various functionalities to help with their studies.
The 4 main functionalities available now are bookmark, timetable, academic tracker and flashcard. Each of this will be discussed in detail under the “Design & Implementation” section later in the document.
About
The target audience for this document are other developers who want to understand the system architecture and design of Study It. The following groups might be the particular intended audience of this developer guide:
- Study It developers - to understand the entire system architecture and follow the design to build increments to the system
- CS2113 lecturer/teaching assistants - to evaluate the system architecture and design of Study It
- CS2113 peers - to understand the architecture and provide feedback
The following are the common notations and symbols used in this document:
bolded text- Class name, folder name in the source code- hyperlinks - Redirects you to different part of the document or open the relevant website
Setting up & getting started
Requirements
- Java 11.0.8
Running the software
- Download the tP.jar file from our Github release and place it in an empty folder
- Open your computer’s command prompt
- Change the directory of the command prompt to the folder containing tP.jar file
- Type
java -jar tp.jarinto the command prompt and press Enter to execute it - If the application runs successfully, you’ll be greeted by a welcome message

Setting up the project on your PC
First, fork this repo, and clone the fork into your computer.
If you plan to use Intellij IDEA (highly recommended):
- Configure the JDK: Configuring the JDK to ensure Intellij is configured to use JDK 11.
- Import the project as a Gradle project.
- Run the studyit.StudyIt and try a few commands.
- Run the tests to ensure they all pass.
Design & implementation
This section explains the architecture of our software and the design of each component.
Major components
This section introduces the multiple components in Study It.

Study It contains 4 major functional components which are the bookmark, timetable, academic and flashcard. Each of these component provide different functionalities, and they combine to form our software – Study It.
| Component | What it does |
|---|---|
| Bookmark | Stores internet links under different categories for easier access |
| Timetable | Tracks and display your weekly schedule |
| Academic | Stores important contacts and keep track of your grades |
| Flashcard | Stores study questions and allow you to quiz yourself for easier memorization |
The main component of Study It helps user access each of these components. It processes the user input, provides general functionalities to traverse the software and other helpful functionalities. This will be further explained under Study It’s design later.
Architecture
This section describes the overall architecture of Study It.

The Architecture Diagram given above explains the high-level design of the software. Each component in the diagram will be briefly explained below.
The main in Study It is responsible for initializing all the other components
in the software.
The following is a brief overview of the components in Study It:
- UI: Handles the communication between the software and the user
- Parser: Processes the input from the user
- Execution: Perform the actions determined by the parser
The following components processes their respective actions (parsing and execution) and handles their own storage component:
- Bookmark
- Timetable
- Academic
- Flashcard
General commands are commands that takes priority in execution no matter which mode the software is currently in.
Modes of the program
Study It has 5 modes that the user can navigate between:
- Main menu: Default mode when booting the software, there are no functionalities tied to this mode
- Bookmark
- Timetable
- Academic
- Flashcard
Each of these modes has their own unique commands. The user must switch to that mode to perform the mode’s functionalities.
User can switch between these modes at any point when using the software.
How the architecture components interact with each other
The following sequence diagram shows the interactions within the software when command is received from the user
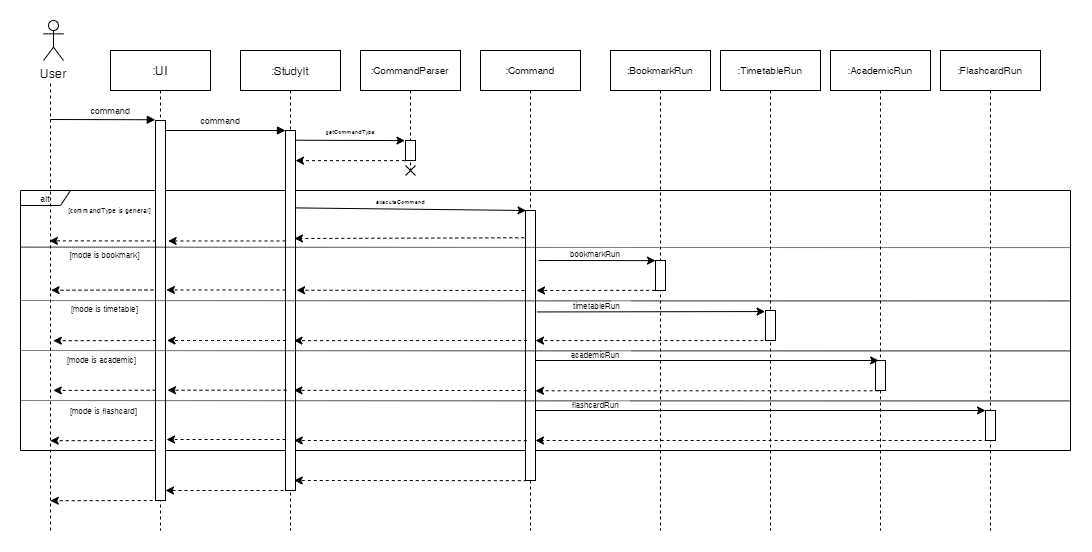
As shown in the sequence diagram above, the user will interact with Study It via the User Interface (UI). The commands received will then be parsed to identify the type of command. If the command is one of the general commands, it’ll be processed and provide output. Otherwise, the command will be relayed to different components to be processed based on the software’s current mode.
Main Component
This section will give an overview of the main component of Study It.
The following class diagram shows the components related to the main Study It component and their respective details.
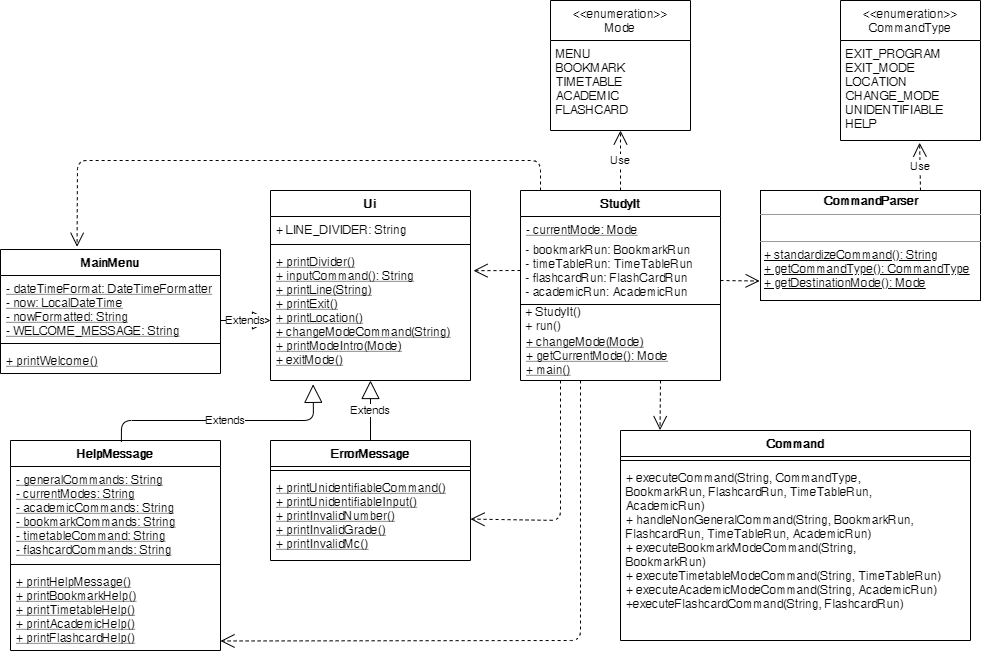
The main class being run for the program is contained under StudyIt class.
As there are multiple modes of our app (main menu/bookmark/timetable/academic/flashcard),
the Mode enumeration and a private static currentMode of Mode type is introduced to monitor the current
operating mode of StudyIt. This is to allow the program to respond to different commands under different modes.
Each command input by the user will be processed by CommandParser class to determine the command type. This information, along with the original command string will be passed into Command class and executed under executeCommand(). If it is one of the general commands, it will be processed by that class. If it isn’t, the Command class will detect the current mode of the program and run that command string under that specific mode, distributed under handleNonGeneralCommand() method. If it still doesn’t parse successfully, it will be considered an invalid command and an error message will be printed out.
The classes Ui, ErrorMessage, HelpMessage and MainMenu help handle the printing of various user interfaces of the program. ErrorMessage, HelpMessage and MainMenu are subclasses of Ui to make use of the methods in Ui.
StudyIt class will also initialize various instances of classes such as TimeTableRun, FlashCardRun,
ArrayList
Bookmark Component
This bookmark section consists of how the bookmark feature is implemented. The bookmark feature is implemented similarly to the main architecture, however, in a smaller scale and a more bookmark-specific way. The figure below illustrates the general overview, the associations and the multiplicity of the bookmark classes.
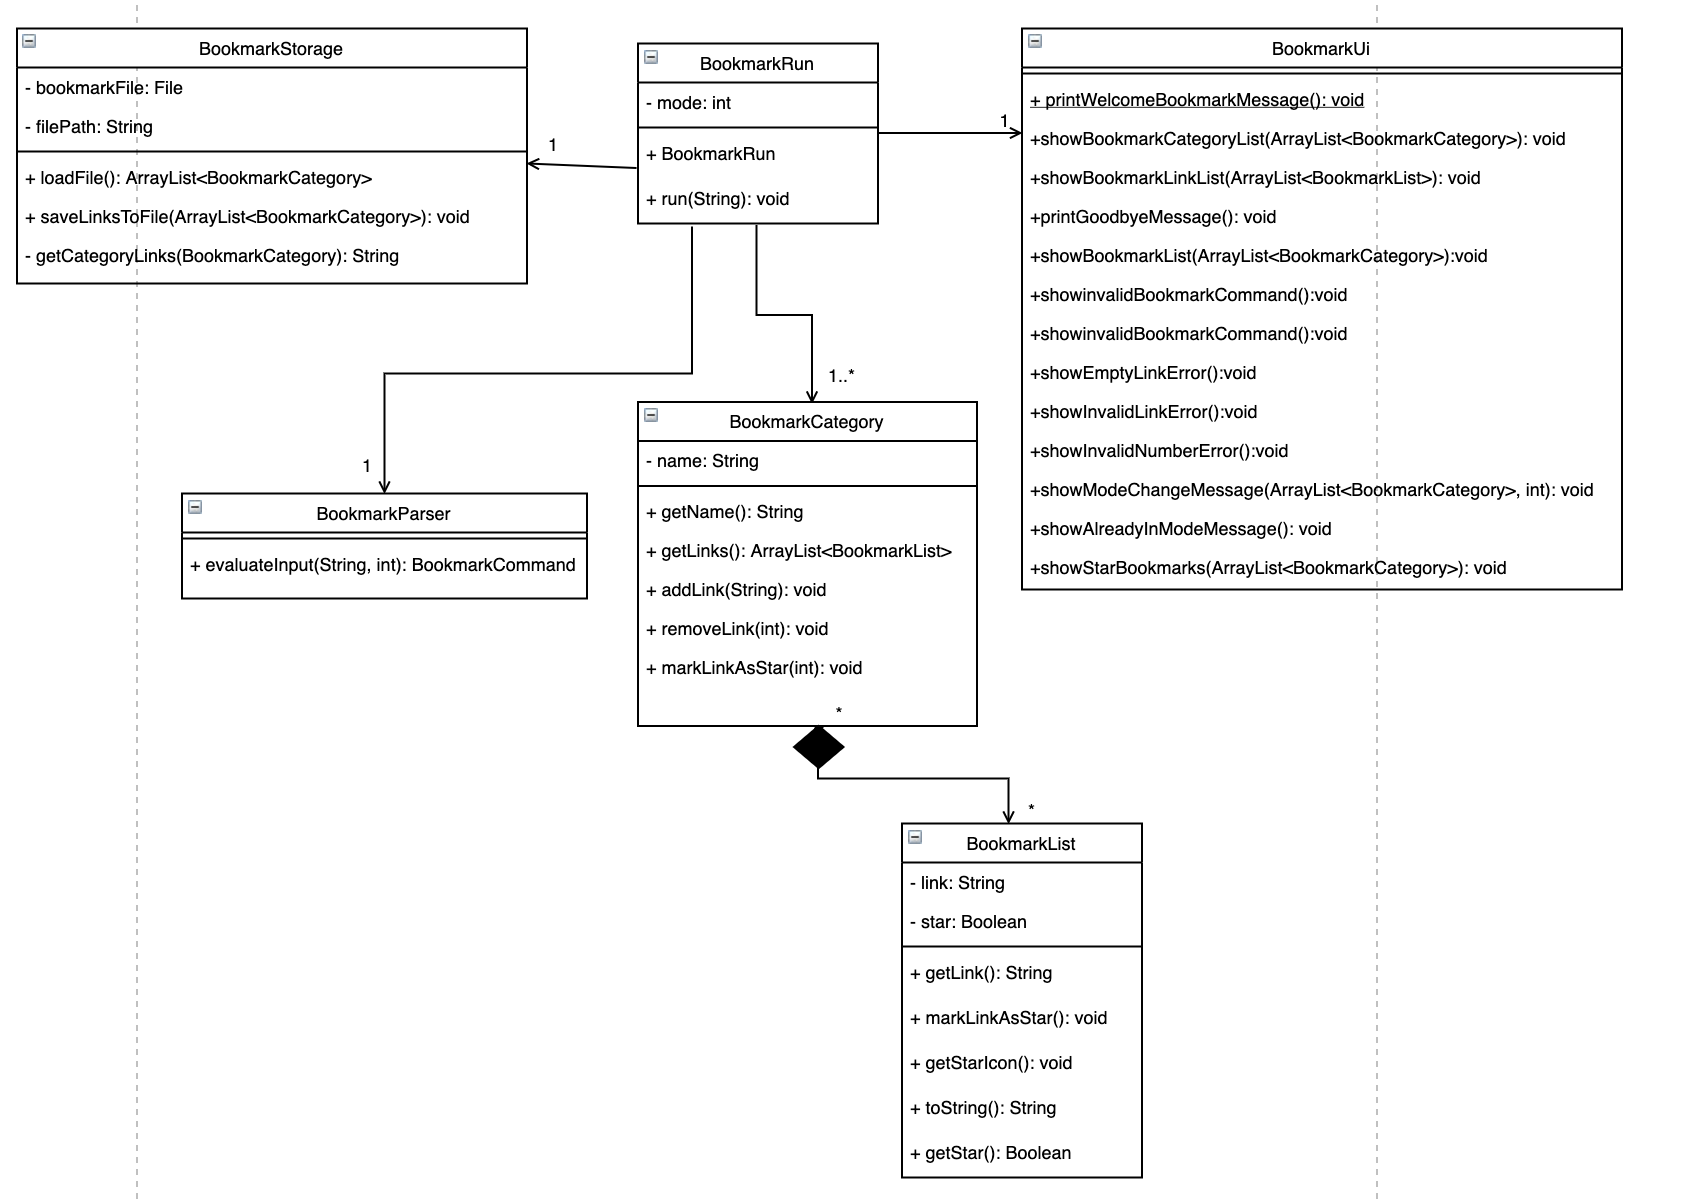
API: BookmarkRun.
The bookmark component consists of six major classes: BookmarkRun, BookmarkStorage, BookmarkUi,
BookmarkCategory, BookmarkList and BookmarkParser.
As shown in the figure above, BookmarkRun is
- The main class to be called when the bookmark mode is accessed.
- The main class to access other bookmark classes.
The figure given below is the sequence diagram of how the classes interact with each other when bookmark mode is accessed from the main function.
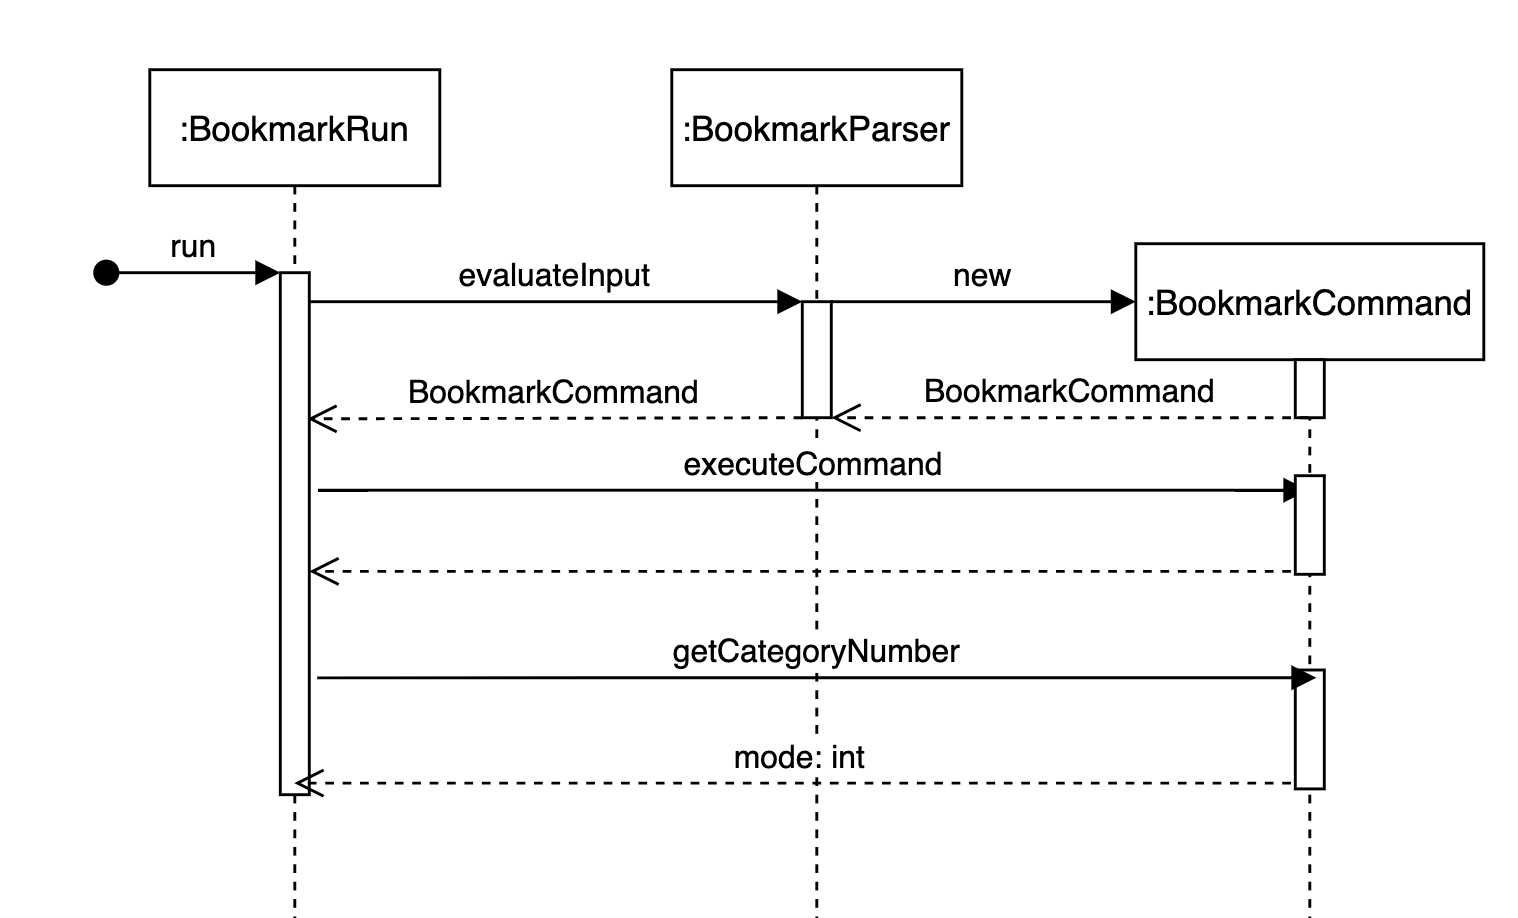
The bookmark component has two modes: the main bookmark mode and the category mode.
As shown in the figure above, when BookmarkRun is called,
BookmarkParser will be called and return a BookmarkCommand.
Afterwards, BookmarkRun will then call executeCommand in BookmarkCommand which executes
the intended actions. Then, it will call getCategorymode to get the current mode the user is in.
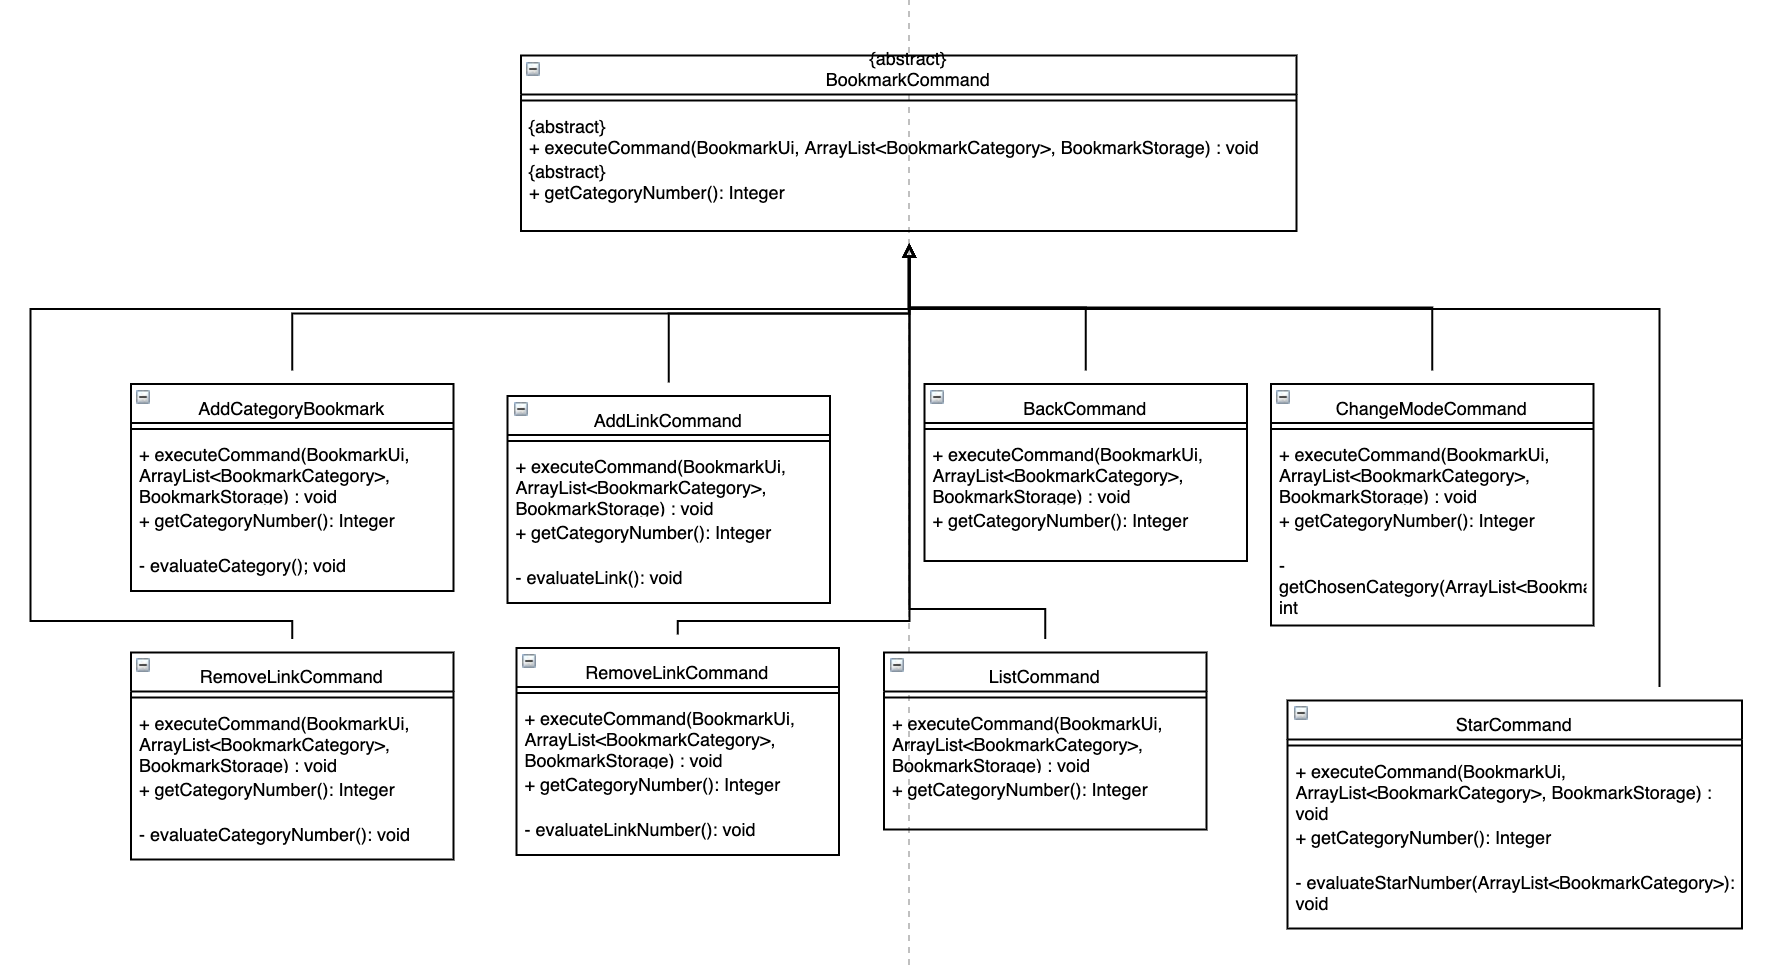
Bookmark Implementation
A more detailed explanation of BookmarkCommand, BookmarkCategory and BookmarkList will be
shown below. BookmarkUi and BookmarkStorage follow the same design implementations as the main
architecture. The below figure shows the command classes available and they are called based on the
BookmarkParser class as illustrated in the figure above.
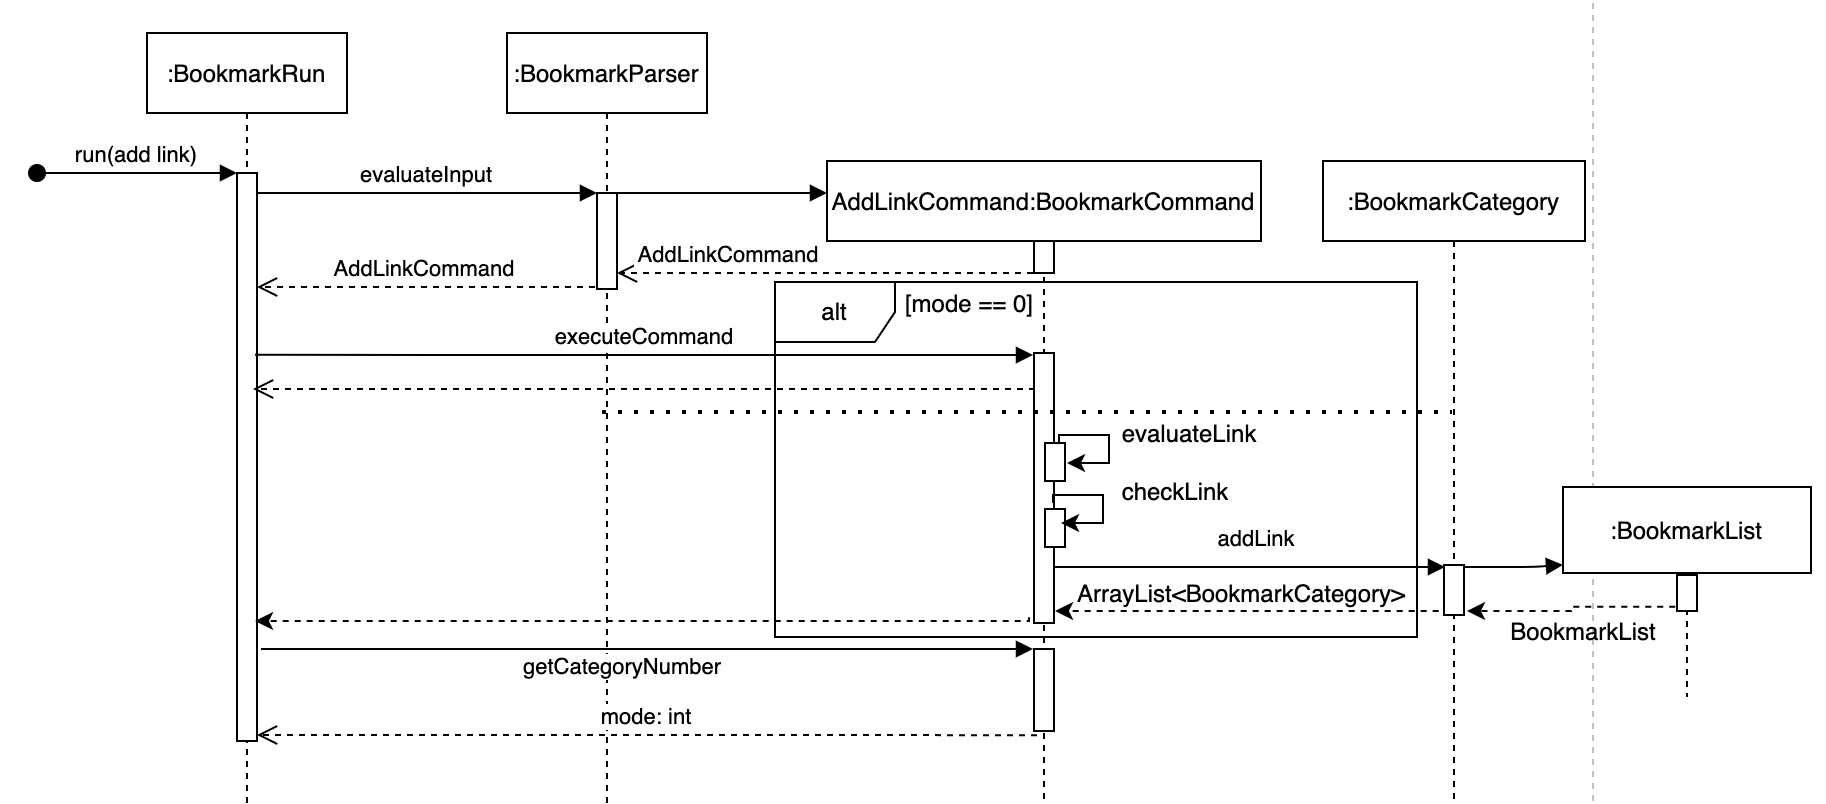
The figure below shows a more detailed sequence diagram of how the BookmarkCategory, BookmarkCommand
and BookmarkList interacts with each other for the scenario when the user input an AddLinkCommand
in Bookmark mode.
Timetable Component
This section will describe in detail how some features inside the timetable section have been implemented.
API: TimeTableRun.
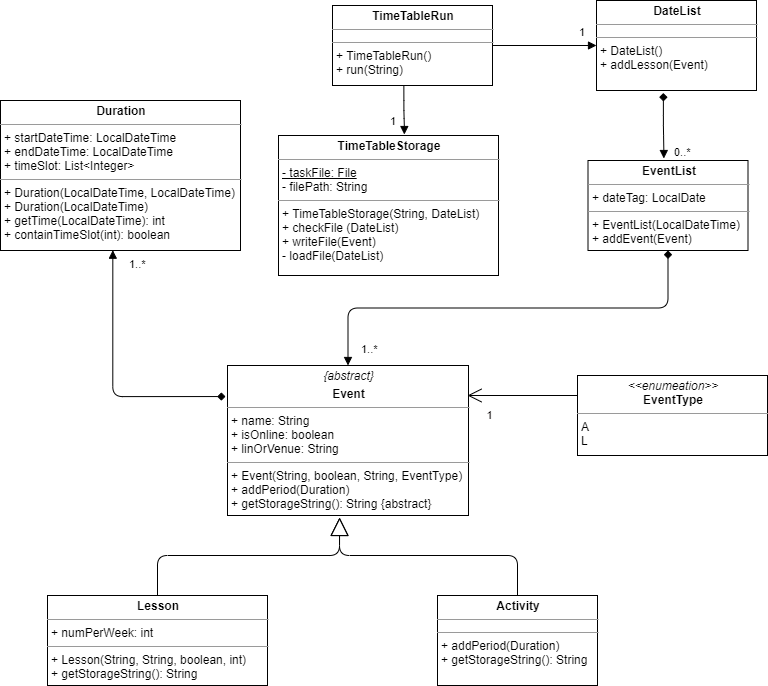
The timetable component consists of 7 major classes as shown. The above figure illustrates the association and the multiplicity of the classes.
- As shown in the figure,
TimetableRunis the main class to be accessed when the timetable function is called. - It associates with the
TimeTableStorageclass which is used to save data into a text file DateListclass that contains a number ofEventList.EventListcontains a number ofEvent.Eventclass is the abstract parent class forLessonandActivity.Eventclass also contains a number ofDurationand it has a dependency on theEvenTypeenum.
Timetable Implementation
This section explains the details on how certain features are implemented in Timetable.
The figure below is the sequence diagram of the major interactions between classes when the main function makes the run(command) API call and the command is “add class”, “show schedule”, “show link”, or “delete class” .
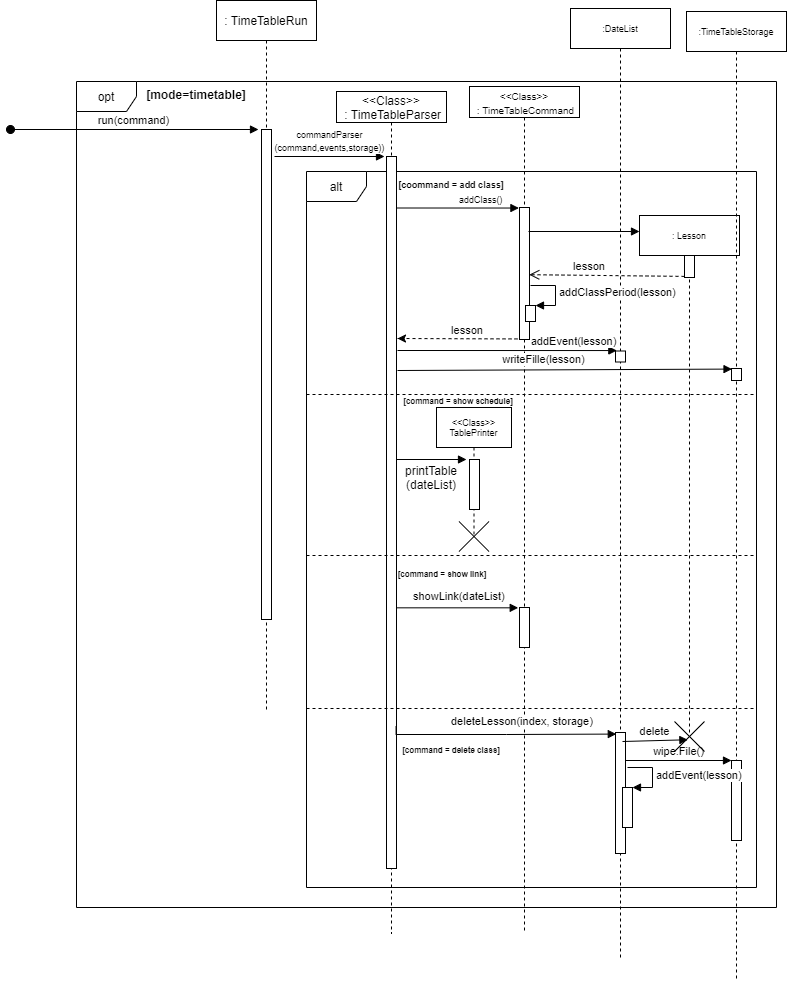
When command=”add class” the run(command) method calls the commandParse() method from the TimeTableParser which the function
will call addClass() function from the TimeTableCommand Class. New Lesson Class will be initialised based on user input.
Following that a addClassPeriod() function will be called taking in the new lesson class initialised to add all the time slots
into lesson class. This class will then be returned to TimetableParser class where it will call the addEvent() method in DateList
to add the new Lesson Class into the arrayList within DateList Class. WriteFile() method in Storage will also be called to
save the infomation of the new Lesson class to the data file.
Other possible commands that are not shown in the diagram will interact between classes in a similar way, where command will be passed to the TimeTableParser Class where it interprets the command and calls the respective function from the TimeTableCommand Class.
Academic Component
This section will describe in detail how some features inside the academic tracker section have been implemented. The following diagram illustrates the general overview, the associations and the multiplicity of the academic classes.
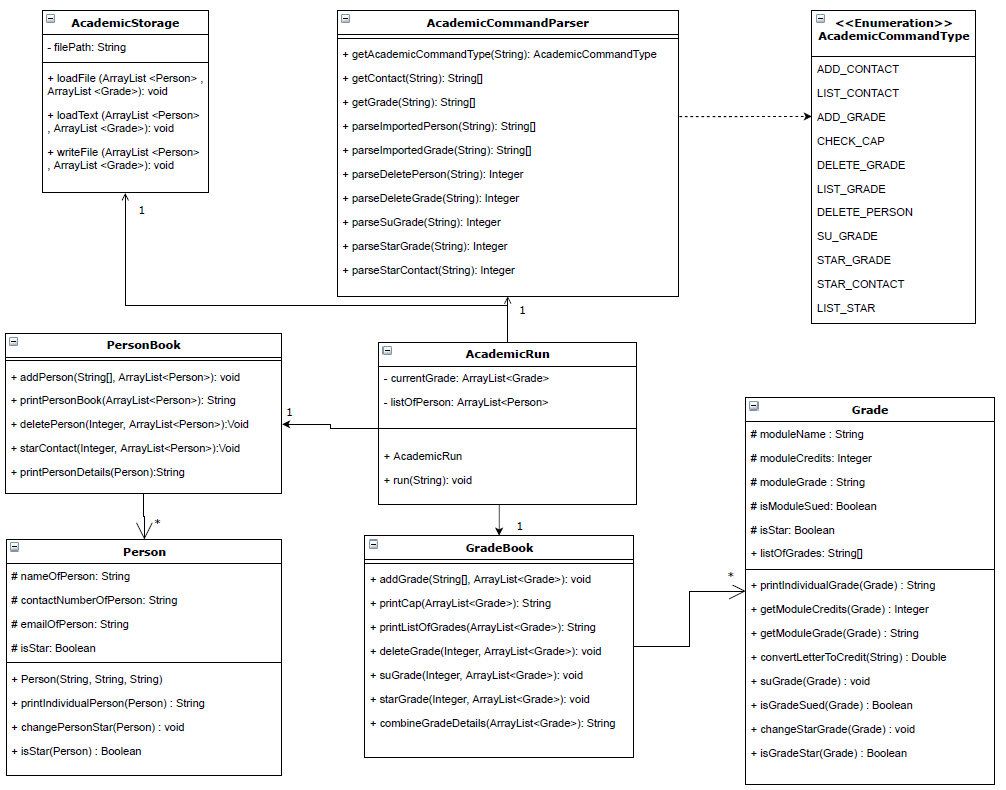
API: java.academic
The above diagram looks at the overall structure of how the academic tracker is being implemented.
This component is split into 7 different classes,
their associations and multiplicity as explained in the above diagram.
The functions of the academic tracker will be called through the AcademicRun class
when the program is in academic mode, which will subsequently call
the functions in PersonBook or GradeBook.
The academic component:
- initialises two arraylists,
ArrayList<Grade>andArrayList<People>to store the relevantGradeandPeopleobjects. - uses
AcademicCommandParserto parse the user command. - identifies
AcademicCommandTypeto decide which of the commands underPersonBookorGradeBookis to be executed. - calls
AcademicStorageto store the current set of data into the local storage file.
Academic Implementation
This section explains the details on how certain features are implemented in the academic tracker.
GradeBook Features
The grade features are facilitated by Gradebook, which further make use of Grade.
Each Grade will contain information such as the module’s title, credits, grade, status of SU and status of star.
All grades are stored internally under AcademicRun as an array list ArrayList<Grade>.
It implements the following important operations:
addGrade(String[], ArrayList<Grade>):Adds aGradeto theArrayList<Grade>.printCap(ArrayList<Grade>):Calculate the current CAP based on theArrayList<Grade>.printListOfGrades(ArrayList<Grade>):Print out all theGradethat are currently stored insideArrayList<Grade>.deleteGrade(Integer, ArrayList<Grade>):Delete aGradefrom a specified index insideArrayList<Grade>.suGradeInGradeBook(Integer, ArrayList<Grade>):Su aGradefrom a specified index insideArrayList<Grade>.starGrade(Integer, ArrayList<Grade>):Star aGradefrom a specified index insideArrayList<Grade>.
The following diagram demonstrates an example of how the Su Grade function works:

With reference to above diagram, it can be observed that whenever a command modifies the array lists,
AcademicStorage is called to update the local storage files.
PersonBook Features
The contact features are facilitated by Personbook, which further make use of Person.
In terms of general structure, it is largely similar to that of GradeBook’s.
Flashcard Component
This section will describe in detail how the flashcard feature is implemented.
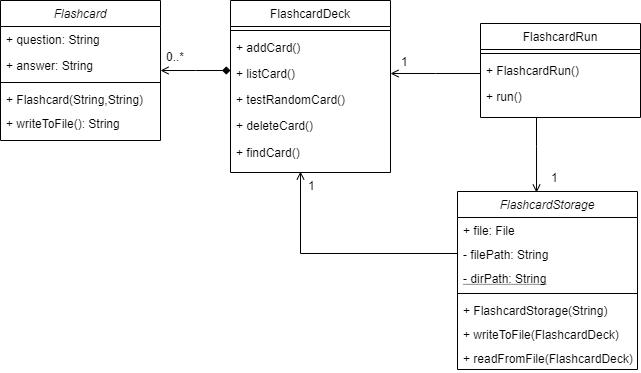
The above diagram looks at the overall structure of how the flashcard component is being implemented. This component is split into 4 different classes, their associations and multiplicity as explained in the above Figure.
- The main class
FlashcardRunwill be accessed when the flashcard mode is called inStudyItClass. FlashcardRunclass is associated withFlashcardStorageclass that is used to store data in .txt file.FlashcardDeckclass which contains any number ofFlashcards.
Flashcard Implementation
This section explains the details on how certain features are implemented in flashcard.
When FlashcardRun is first initialised by StudyIt, it will construct
the FlashcardDeck class.
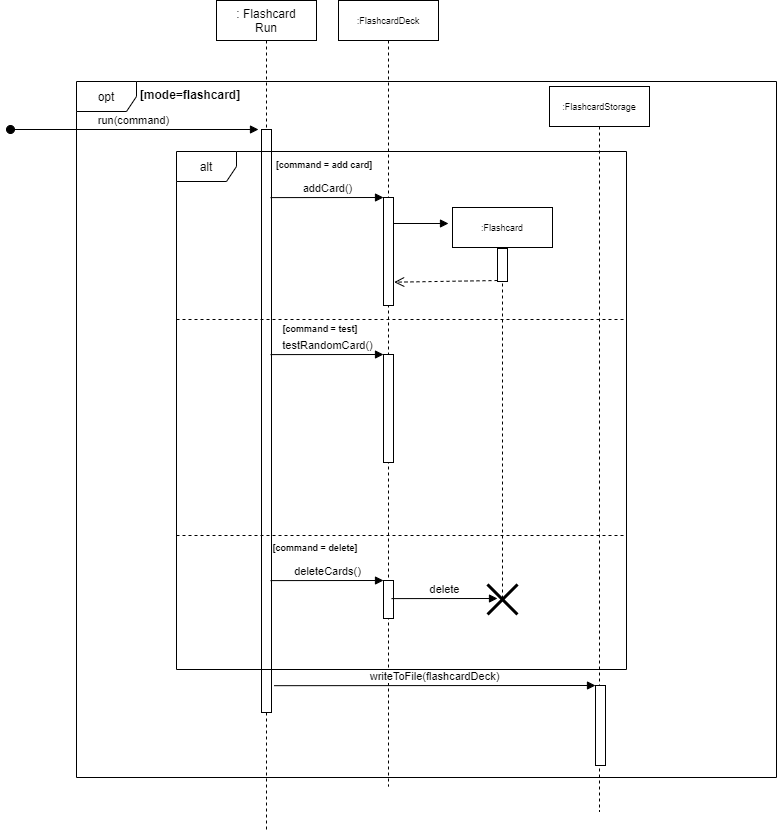
With reference to the figure above, as an “add card” command is given by the user, FlashcardRun will take in the
command and call addCard() method in FlashcardDeck which constructs a new Flashcard object and stores
it inside the FlashcardDeck object. The addCard() function will then show the user the question and
answer of the flashcard that has been created.
Other possible commands that are not shown in the figure work in a similar way where command is parsed in FlashcardRun Class,
and calls the corresponding function within the FlashcardDeck Class. WriteToFile function is called at the end of the
process to update any changes to the deck to the data file.
Documentation, logging, testing, configuration, dev-ops
Testing guide
Running tests:
The main way that was used to run the test for Study It is:
Using IntelliJ JUnit test runner.
A. To run all tests, right-click on the src/test/java folder and choose
Run Test in ‘tp.test’
B. To run a subset of tests, you can right-click on a test package,
test class or a test and choose Run ‘ABC’.
Type of Tests
This project has 5 types of tests. 4 tests to test each feature and 1 test to test the main integration of the whole application.
Logging guide
We are using java.util.logging package for logging. The StudyItLog class is used to manage the logging levels and logging destinations. Log messages are output through the console and to a .log file. The output logging level can be controlled using .setlevel( ) When choosing a level for a log message, follow the following conventions:
- SEVERE: A critical problem detected which may cause the termination of the application.
- WARNING: Can continue, but with caution.
- INFO: Information showing the noteworthy actions by the App.
- FINE: Details that are not usually noteworthy but may be useful in debugging.
DevOps Guide
Build automation: This project uses Gradle for build automation management. ./gradlew build - check for checkstyle error and runs all tests Code coverage This project uses code coverage that is in IntelliJ IDE to check for the coverage of the code.
Appendix: Requirement
Product scope
Target user profile:
- studies in NUS
- has a need to manage a significant number of links
- has a need to manage their classes in a timetable
- has a need to manage their grades
- has a need to manage contact numbers of professors and teaching assistants.
- has a need to memorise content to study
- prefer desktop apps over other types
- can type fast
- prefers typing to mouse interactions
- is reasonably comfortable using CLI apps
Value proposition:
- manage links faster than a typical mouse/GUI driven app
- manage grades more easily than a typical mouse/GUI driven app
- manage contact numbers of professors and teaching assistants more effectively than a typical mouse/GUI driven app
- manage timetable in a more organised manner than a typical mouse/GUI driven app
- manage study content more efficiently than a typical mouse/GUI driven app
User Stories
| Version | As a … | I want to … | So that I … |
|---|---|---|---|
| v1.0 | Student in Nus | organise my zoom links | don’t need to find the zoom link everytime lectures/tutorials start. |
| v1.0 | student attending online classes | keep track of the timetable of my lessons whether it is online or offline | do not miss any lessons. |
| v2.0 | Student in Nus | organise all the useful signup links (internship/ hackathon/ talks) sent to our emails | can keep track of my time and dates of any relevant events. |
| v1.0 | Student in Nus | keep track of my results and the number of SUs I have left, | can plan my semester properly |
| v1.0 | student with packed timetables | see clashes in my timetable | can plan things without overlapping events. |
| v1.0 | student taking a mod that requires me to memorize a lot of contents | organize the contents into flashcards | can revise them on the go. |
| v1.0 | student who is worried about my results | calculate my CAP based on estimated grades | know i won’t get expelled :’) |
| v1.0 | Student in Nus | keep track of my profs and ta’s contacts | know who to find when i have troubles. |
| v1.0 | Student in Nus | bookmark all the important NUS websites | can access them more easily |
Non-Functional Requirements
- Should work on any mainstream OS as long as it has Java 11 or above installed.
- A user with above average typing speed for regular English text (i.e. not code, not system admin commands) should be able to accomplish most of the tasks faster using commands than using the mouse.
Glossary
- Mainstream OS - Windows, Unix, Linux, OS-X